


Comprehensive installation guide for professional-grade solar automatic doors
Installing a solar chicken coop door transforms your daily poultry management routine while ensuring your flock's safety and security. This comprehensive guide walks you through every aspect of solar chicken coop door installation, from initial planning to final testing and troubleshooting.
Quick Answer: Solar Chicken Coop Door Installation
Solar chicken coop door installation typically takes 2-4 hours and requires basic tools. Key steps include mounting the door frame, positioning the solar panel for optimal sun exposure, connecting the battery backup system, and programming the controller. Professional-grade systems include pre-wired components for simplified installation.
Essential requirements: 15-watt solar panel minimum, 12V battery backup, weather-protected controller location, and southern exposure for optimal solar collection.
Why Choose Solar Chicken Coop Door Installation?
Before diving into the installation process, understanding the advantages of solar-powered automatic doors helps justify the investment and effort required for proper setup.
Energy Independence and Reliability
Solar chicken coop door installation eliminates dependence on grid electricity, making it ideal for remote coops, off-grid properties, and areas prone to power outages. Modern solar systems provide reliable operation even during extended cloudy periods through efficient battery backup systems.
Cost-Effective Long-Term Operation
While initial solar chicken coop door installation requires higher upfront investment, operating costs remain minimal for decades. Quality solar panels operate efficiently for 20+ years, while battery replacements every 3-5 years represent the only ongoing expense.
Environmental Sustainability
Solar chicken coop door installation aligns with sustainable farming practices by utilizing renewable energy. Zero grid electricity consumption reduces your carbon footprint while maintaining professional-grade automation and security features.
Solar Chicken Coop Door Installation Planning and Preparation
Successful solar chicken coop door installation begins with thorough planning and site assessment. Proper preparation prevents installation delays and ensures optimal long-term performance.
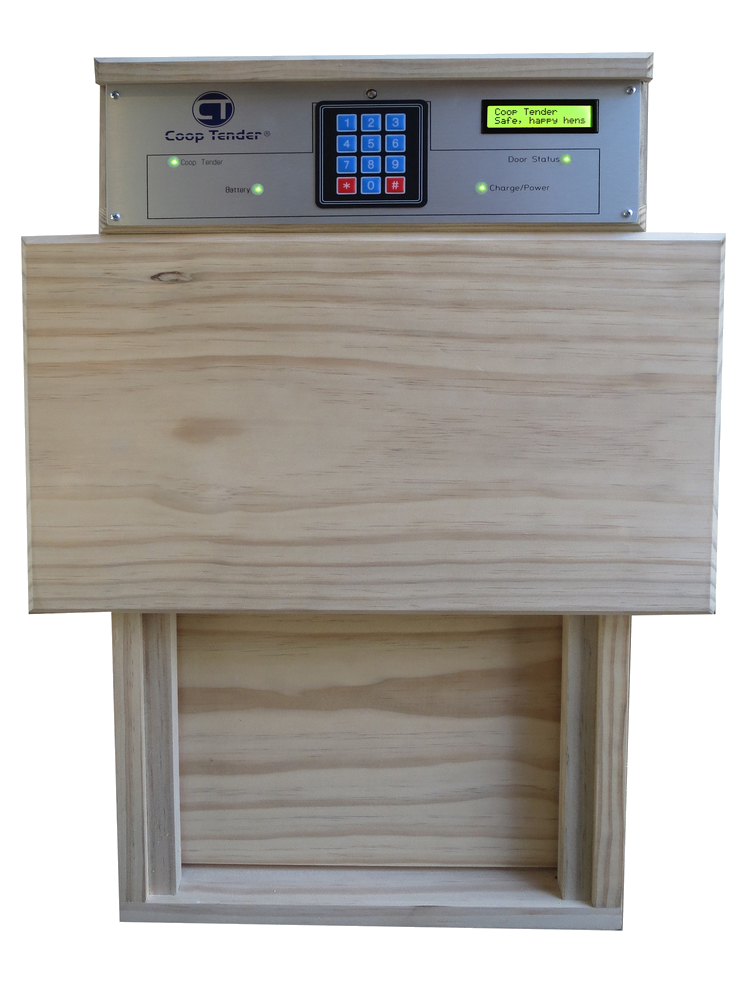
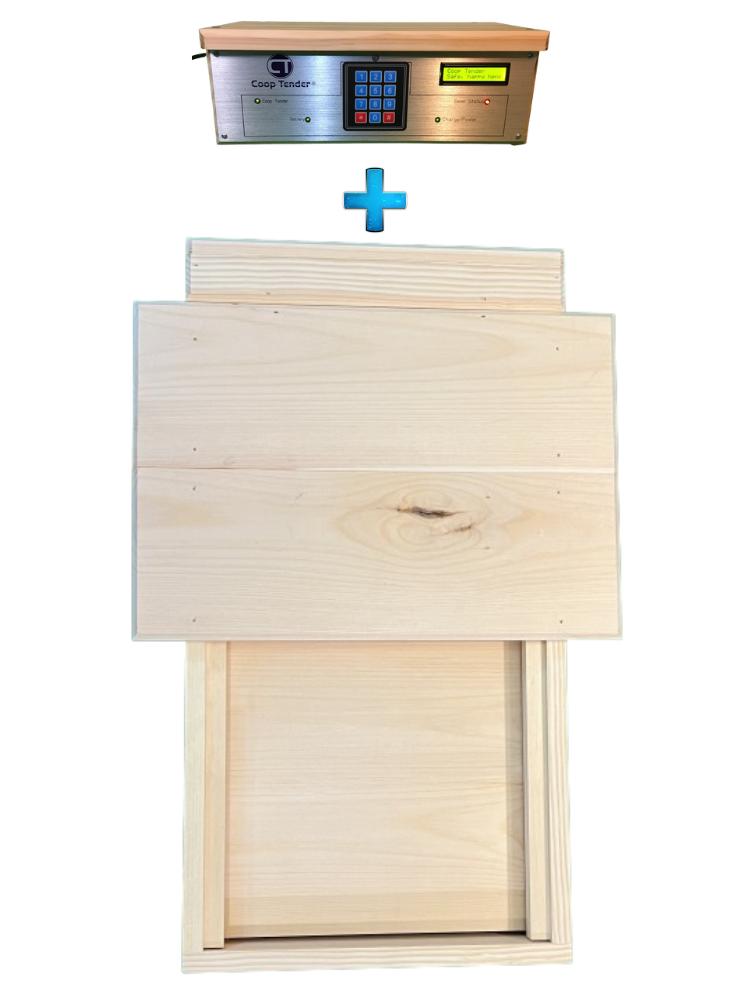
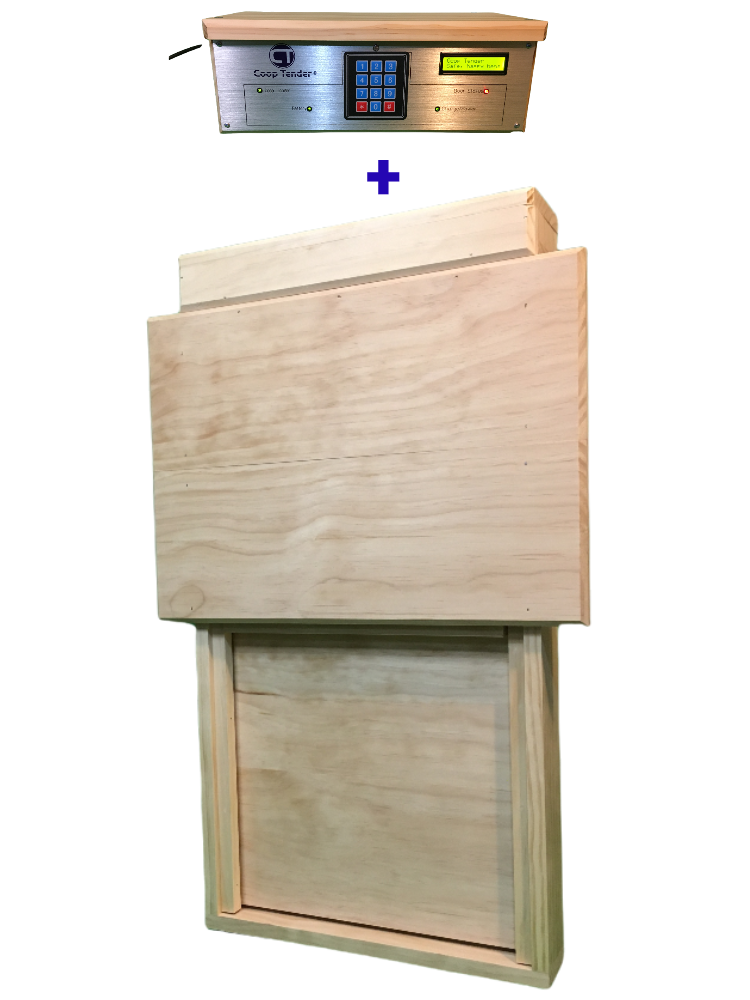
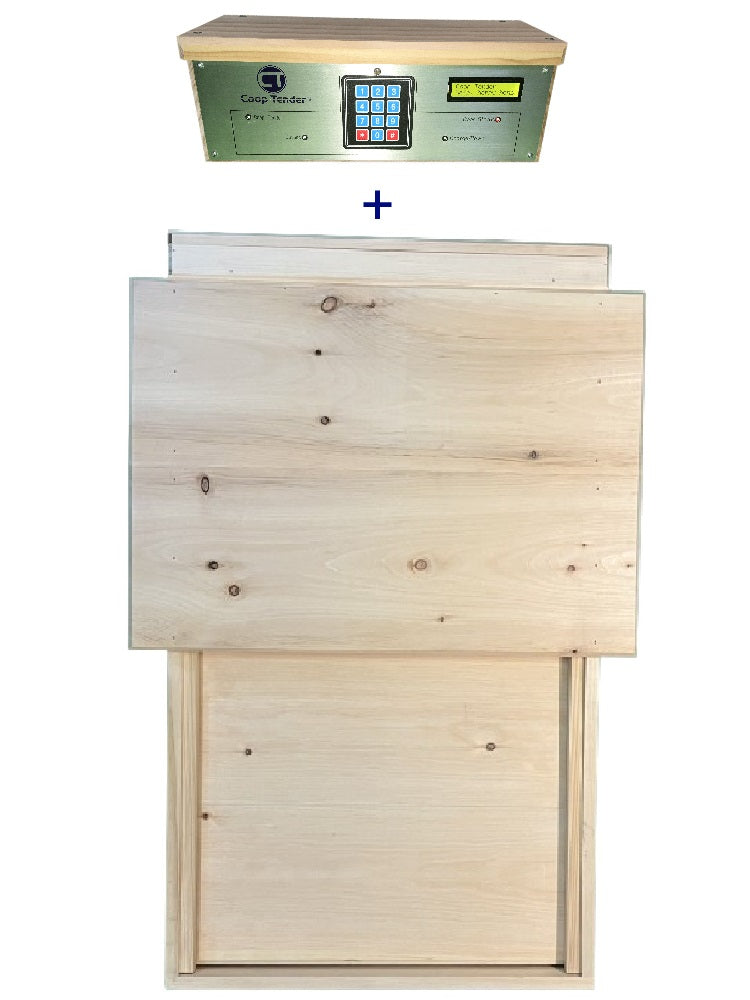
Essential Components for Solar Chicken Coop Door Installation
Door Assembly Components:
- Steel worm drive mechanism - Self-locking predator-proof drive system
- Digital controller - Microprocessor-based timing and safety controls
- Light sensor - Automatic dawn/dusk operation capability
- Manual override - Emergency access during maintenance or power issues
- Weatherproof housing - Protects electronics from moisture and temperature extremes
Solar Power System Components:
- 15-watt monocrystalline solar panel - Minimum power for reliable year-round operation
- 12V sealed lead-acid battery - 5+ day backup power capacity
- MPPT charge controller - Optimizes power conversion and battery charging
- Marine-grade wiring - Weatherproof connections and long-term reliability
Installation Hardware:
- Stainless steel mounting screws - Corrosion-resistant securing hardware
- Weatherproof cable glands - Seal electrical penetrations
- Installation template - Ensures precise door opening dimensions
- Comprehensive manual - Step-by-step instructions with diagrams
Site Assessment for Optimal Solar Chicken Coop Door Installation
Solar Panel Placement Requirements: Successful solar chicken coop door installation requires strategic solar panel positioning for maximum energy collection throughout the year.
- Southern exposure preferred - Maximizes daily sun exposure in northern hemisphere
- 6-8 feet mounting height - Avoids shading from nearby structures or vegetation
- 30-45 degree tilt angle - Optimizes seasonal solar collection efficiency
- Accessible location - Enables periodic cleaning and maintenance access
Door Location Considerations: Proper door placement ensures smooth operation and optimal flock management during your solar chicken coop door installation.
- Structural integrity - Verify adequate support for 25-30 pound door assembly
- Weather protection - Shield electronic components from direct rain and wind
- Chicken traffic patterns - Position for natural flock movement and accessibility
- Security positioning - Avoid creating predator access points or hiding spots
Required Tools for Solar Chicken Coop Door Installation
Basic Hand Tools:
- Cordless drill with wood and metal bits
- Screwdrivers (Phillips and flathead varieties)
- Level (2-foot minimum for accurate alignment)
- Measuring tape (25-foot recommended)
- Wire strippers for electrical connections
- Multimeter for testing electrical circuits
Specialized Tools:
- Jigsaw or reciprocating saw for cutting door openings
- Hole saw kit for precise circular cuts
- Caulk gun with weatherproof sealant
- Safety glasses and work gloves for protection
Step-by-Step Solar Chicken Coop Door Installation Process
This comprehensive solar chicken coop door installation process ensures professional results and long-term reliability through systematic implementation.
Phase 1: Door Frame Installation (60-90 minutes)
Step 1: Create Precise Door Opening Accurate door opening dimensions are critical for proper solar chicken coop door installation and smooth operation.
Using the provided installation template:
- Mark cutting lines precisely on coop wall interior and exterior
- Verify measurements twice before cutting to prevent costly mistakes
- Cut opening carefully using jigsaw with fine-tooth blade for clean edges
- Test fit door frame before proceeding to permanent installation
Standard door opening requirements:
- 10" x 10" door: 13.5" W x 26.5" H cutout required
- 12" x 12" door: 15" W x 28.25" H cutout required
- 15" x 15" door: 17.5" W x 34.25" H cutout required
Step 2: Frame Preparation and Mounting Proper frame installation provides the foundation for reliable solar chicken coop door installation performance.
- Position frame assembly flush with exterior coop wall surface
- Check alignment using level to ensure perfectly vertical installation
- Mark screw locations through pre-drilled mounting holes
- Secure with stainless steel screws into solid structural members
- Apply weatherproof sealant around frame perimeter
- Test manual door operation before proceeding to electrical connections
Phase 2: Solar Panel Installation (45-60 minutes)
Step 3: Solar Panel Positioning and Mounting Optimal solar panel placement ensures reliable power generation throughout your solar chicken coop door installation's operational life.
Panel Orientation Guidelines:
- Face true south for maximum daily energy collection
- Tilt 30-45 degrees based on your geographic latitude
- Avoid shading from trees, buildings, or other obstructions
- Secure mounting using included brackets and stainless steel hardware
Mounting Location Options:
- Coop roof mounting - Most common and effective placement
- Nearby post installation - Alternative for roof access challenges
- Ground-level mounting - Accessible but requires protection from chickens
- Wall mounting - Possible but may reduce optimal sun exposure
Step 4: Solar Panel Wiring and Connections Professional-grade wiring ensures safe, reliable solar chicken coop door installation performance.
- Route cables through weatherproof glands to prevent moisture intrusion
- Connect positive lead (red wire) to charge controller solar input
- Connect negative lead (black wire) maintaining proper polarity
- Secure all connections with provided weatherproof connectors
- Test solar output using multimeter (expect 12-18V in direct sunlight)
Phase 3: Battery and Controller Installation (45-75 minutes)
Step 5: Battery System Installation Proper battery installation provides reliable backup power for your solar chicken coop door installation during cloudy periods and nighttime operation.
Battery Placement Requirements:
- Interior coop location protects from temperature extremes
- Ventilated area prevents gas accumulation from charging
- Accessible position enables easy maintenance and replacement
- Secure mounting prevents movement during door operation
Battery Connection Process:
- Connect positive terminal (red cable) with provided ring terminals
- Connect negative terminal (black cable) ensuring tight connections
- Apply terminal protectant to prevent corrosion over time
- Test battery voltage (should read 12.6V+ when fully charged)
Step 6: Controller Programming and Configuration Digital controller programming customizes your solar chicken coop door installation for optimal flock management and security.
Initial Programming Steps:
- Power up system and verify LED status indicators
- Set current time using keypad interface
- Program dawn/dusk delays based on flock behavior patterns
- Configure freeze protection threshold (typically 20°F default)
- Test operating modes including manual override functionality
Operating Mode Options:
- Dawn-to-dusk mode - Automatic operation based on light sensors
- Schedule mode - Fixed timing regardless of lighting conditions
- Manual mode - Complete user control for special circumstances
- Hybrid mode - Combines sensor and schedule operation
Solar Chicken Coop Door Installation Testing and Verification
Comprehensive testing ensures your solar chicken coop door installation operates reliably and safely for years to come.
System Performance Testing
Power System Verification: Complete solar chicken coop door installation requires thorough electrical system testing to verify all components function correctly.
- Solar panel output test - Measure 12-18V in direct sunlight
- Battery charging verification - Confirm charge controller LED indicators
- Load testing - Verify system powers door operation cycles
- Backup capacity test - Ensure 5+ day operation without solar input
Mechanical Operation Testing: Proper mechanical testing validates smooth, reliable door operation throughout your solar chicken coop door installation's service life.
- Manual override test - Verify emergency operation capability
- Automatic cycle test - Confirm smooth opening and closing
- Obstruction detection - Test safety features prevent damage
- Weather seal verification - Check door closes completely and securely
Programming Optimization
Dawn/Dusk Timing Adjustment: Fine-tune automatic operation for optimal solar chicken coop door installation performance based on your specific flock behavior and local conditions.
Dawn Delay Settings:
- Default: 0 minutes - Door opens immediately at dawn
- Predator protection - 15-30 minute delay if threats present after dawn
- Weather considerations - Longer delays during harsh morning conditions
- Flock behavior - Adjust based on chickens' natural waking patterns
Dusk Delay Settings:
- Default: 10 minutes - Allows stragglers time to enter coop
- Flock size consideration - Larger flocks may need 15-20 minute delays
- Seasonal adjustment - Longer delays during breeding season activity
- Individual bird accommodation - Extra time for slower or reluctant chickens
Troubleshooting Common Solar Chicken Coop Door Installation Issues
Even professional solar chicken coop door installation may encounter occasional issues. This troubleshooting guide addresses common problems and solutions.
Solar Power System Problems
Issue: Low Battery Voltage or Poor Charging Solar power problems can affect your solar chicken coop door installation's reliability and require systematic diagnosis.
Diagnostic Steps:
- Check solar panel orientation - Verify south-facing placement
- Clean panel surface - Remove dirt, bird droppings, or debris
- Test panel output - Measure voltage in direct sunlight
- Inspect connections - Look for corrosion or loose terminals
- Verify charge controller - Check LED indicators and settings
Solutions:
- Reposition panel for better sun exposure if shading issues exist
- Replace corroded connections with marine-grade alternatives
- Upgrade battery if capacity degraded after 3-5 years of service
- Add additional panel if power demands exceed single panel capacity
Issue: Inconsistent Operation During Cloudy Weather Weather-related performance issues may affect solar chicken coop door installation reliability during extended overcast periods.
Diagnostic Steps:
- Monitor battery voltage during cloudy periods
- Check power consumption versus generation rates
- Verify charge controller efficiency and settings
- Assess backup capacity relative to operational demands
Solutions:
- Upgrade to larger battery (7-10 Amp-hour capacity)
- Add second solar panel for increased charging capacity
- Optimize power consumption through programming adjustments
- Install AC backup for critical applications in areas with limited sun
Mechanical Operation Issues
Issue: Door Binding or Slow Operation Mechanical problems can affect solar chicken coop door installation performance and require physical inspection and maintenance.
Diagnostic Steps:
- Test manual operation to isolate electrical versus mechanical issues
- Inspect door tracks for debris, ice, or structural damage
- Check alignment of door frame and mounting hardware
- Examine drive mechanism for lubrication needs or wear
Solutions:
- Lubricate worm drive with marine-grade waterproof grease
- Clear obstructions from door tracks and surrounding areas
- Adjust door alignment if settling or structural changes occurred
- Replace worn components following manufacturer specifications
Issue: Light Sensor Malfunction or Erratic Timing Sensor-related issues can cause unpredictable solar chicken coop door installation behavior requiring sensor inspection and adjustment.
Diagnostic Steps:
- Clean sensor surface with soft, lint-free cloth
- Check sensor positioning relative to artificial light sources
- Test sensitivity settings during various lighting conditions
- Verify wiring connections to controller inputs
Solutions:
- Relocate sensor away from interfering light sources
- Adjust sensitivity through controller programming menu
- Shield sensor from direct artificial lighting if necessary
- Switch to schedule mode as backup during sensor troubleshooting
Seasonal Maintenance for Solar Chicken Coop Door Installation
Regular maintenance extends your solar chicken coop door installation's service life and ensures reliable year-round operation.
Quarterly Maintenance Tasks
Solar Panel Care:
- Clean panel surface with soft cloth and mild soap solution
- Inspect mounting hardware for looseness or corrosion
- Check cable connections for weather damage or wear
- Verify optimal positioning hasn't been affected by settling or growth
Battery System Maintenance:
- Test battery voltage under load and at rest
- Clean terminals and apply corrosion protection
- Check electrolyte levels in serviceable batteries
- Monitor charging performance through controller indicators
Door Mechanism Service:
- Lubricate drive components with appropriate marine-grade grease
- Inspect door alignment and adjust if necessary
- Test safety features including obstruction detection
- Verify manual override operation for emergency access
Annual Comprehensive Service
Complete System Inspection:
- Performance testing of all electrical and mechanical components
- Weatherproofing renewal including sealants and gaskets
- Programming optimization based on seasonal changes and flock behavior
- Preventive replacement of wear items before failure occurs
Documentation and Planning:
- Record maintenance performed for warranty and service history
- Plan upcoming replacements based on component lifespans
- Assess performance changes over time for optimization opportunities
- Budget for future upgrades or capacity expansions
Frequently Asked Questions: Solar Chicken Coop Door Installation
How difficult is solar chicken coop door installation for beginners?
Solar chicken coop door installation is designed for DIY completion with basic tools and skills. Most installations take 3-4 hours for beginners, 2 hours for experienced DIYers. Pre-wired components and comprehensive instructions eliminate complex electrical work.
What tools are required for solar chicken coop door installation?
Essential tools include cordless drill, screwdrivers, level, measuring tape, wire strippers, and multimeter. All mounting hardware and electrical components are included. A jigsaw may be needed for creating door openings in existing coops.
How much sunlight is needed for successful solar chicken coop door installation?
Solar chicken coop door installation requires panels positioned for 3-4 hours of direct sunlight daily for reliable operation. 15-watt panels provide adequate power in most climates when properly oriented toward the south with minimal shading.
Can I complete solar chicken coop door installation on an existing coop?
Yes, solar chicken coop door installation works on most existing coops. You'll need to cut a door opening to specifications, but the installation process is similar to new construction. Structural assessment may be needed for older coops.
What are common mistakes in solar chicken coop door installation?
Common solar chicken coop door installation mistakes include inadequate solar panel orientation, insufficient weatherproofing of connections, incorrect battery polarity, and skipping the initial system testing phases.
How do I maintain my system after solar chicken coop door installation?
After solar chicken coop door installation, perform quarterly maintenance: clean solar panel surface, check battery voltage, lubricate door mechanism, and verify all electrical connections remain secure and corrosion-free.
What happens if my solar chicken coop door installation fails during bad weather?
Quality systems include manual override capabilities allowing emergency operation during any system failure. Battery backup provides 5+ days of operation during extended cloudy periods or solar panel issues.
How long do components last after solar chicken coop door installation?
Solar panels typically operate efficiently for 20+ years, batteries require replacement every 3-5 years, and mechanical components can last 10-15 years with proper maintenance following solar chicken coop door installation.
Conclusion: Professional Solar Chicken Coop Door Installation Success
Successful solar chicken coop door installation provides years of reliable, automated flock management while eliminating daily manual labor and ensuring consistent predator protection. Following this comprehensive guide ensures professional results and optimal long-term performance.
The investment in quality solar chicken coop door installation pays dividends through improved flock security, operational convenience, and peace of mind knowing your chickens receive consistent protection regardless of weather, schedule conflicts, or travel plans.
Ready to begin your solar chicken coop door installation? Gather your tools, assess your site, and follow this step-by-step guide for professional results that will serve your flock for many years to come.
For additional support or specific technical questions about your solar chicken coop door installation, contact our technical support team for expert guidance from the engineers who design and manufacture these systems.
Solar chicken coop door installation represents a significant step toward modern, sustainable poultry management that benefits both chickens and their caretakers through reliable automation and renewable energy independence.
Leave a comment